When planning a tech talk with some folks on IoT development, we had to come up with several sensors to demo in order to feed a backend server module. An obvious choice was a PIR motion sensor, which is very straightforward and easy to build. Someone suggested a distance sensor, and having previously worked with a Sharp IR distance sensor (2Y0A02) on an Arduino it seemed like a perfect win.
So, we committed to building this sensor using the Raspberry Pi as our platform. As we started the development process, we discovered when looking at the datasheets for the Raspberry Pi and the Sharp sensor there was something we overlooked.
The Sharp IR sensor outputs an analog signal, whereas the Raspberry Pi GPIO pins are digital. So in order to build a Raspberry Pi Distance device we have to overcome this.
Analog/Digital converter chip
Enter the MCP3008 Analog/Digital converter chip as the solution to the problem.
This chip does exactly what is advertised. It converts an analog signal into a digital one, so the output can be understood and processed by our Raspberry Pi.
The wiring of this chip can be a little confusing to follow as there are quite a few jumper wires from this 16 pin chip. However, we are not using all the pins, only 9 of them.
Start by mounting the chip carefully, straddling the prototype breadboard.
For the connections, a picture is truly worth at least 550 words.
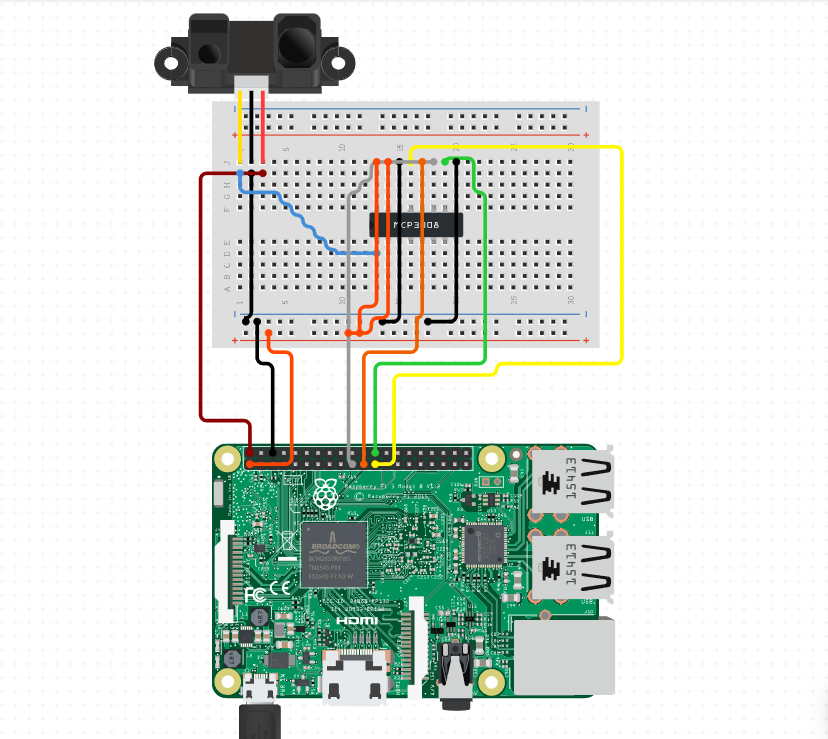
Here are the highlights:
- Connect the IR sensor to the 5v power from the Raspberry Pi.
- Connect the 3.3v power from the Raspberry Pi to an available power bus. This will be the power source for the chip.
- Establish a common GND by connect the IR sensor to a negative bar. We will connect the chip GND, IR sensor, and Raspberry Pi this GND.
- Connect the input data pin of the MCP3008 Chip to the output of the IR sensor
- There are 2 power and 2 GND connections on the chip. Connect them to the 3.3v power bus and GND bus, respectively
- Carefully make the remaining 4 data connections from the MCP3008 to the Raspberry Pi
That should complete the wiring for our Raspberry Pi distance device.
Python code for interpreting the distance data from the IR sensor
We are going to create a python script similar to the motion sensor, in that we will define some libraries, pins, and create some logic to print out an approximate distance.
We will also be needing some additional libraries, which we can install with pip or pip3, depending on what you use.
import time
import Adafruit_GPIO.SPI as SPI
import Adafruit_MCP3008

# define the pins on the MCP3008 we will be using, and mapping them to the pi
# the var is the name of the chip pin/function and the number is the Pi GPIO
CLK = 11
DIN = 10
DOUT = 9
CS = 8

# define the time to wait between taking another reading, in seconds
delay = 5

# setup the chip
mcp = Adafruit_MCP3008.MCP3008(clk=CLK, cs=CS, miso=DIN, mosi=DOUT)

try:
    while True:
        v = (mcp.read_adc(0) / 1023.0) * 3.3
        # math to convert the reading into an actual distance
        dist = 16.2537 * v**4 - 129.893 * v**3 + 382.268 * v**2 - 512.611 * v + 301.439
        print("Distance {:.2f}".format(dist))
        time.sleep(delay)
except KeyboardInterrupt:
print("Exiting program")It may seem like there is a lot going on here, but it’s not too bad. We import the libraries we need (as mentioned use pip/pip3 to install what you might need on the Raspberry Pi). We define 4 pins as and assigning the GPIO pins on the Raspberry Pi to them. We also added a delay, which we will use as the time.sleep input value.
We setup the chip using line 16, using the MCP3008 library we just imported.
Again, as with the motion sensor, we wrap everything in a try block and start our infinite loop. We then start reading the value coming from the sensor as the data is fed through the converter chip. This gives us raw numerical data, which is fed through the formula on line 22 to return a distance (in cm). That distance is printed to a precision of 2 using format.
Then the time.sleep kicks in, waiting 5 seconds before taking another distance reading.
Follow the commit on gitlab.com
Testing the Raspberry Pi Distance setup
The IR chip of course isn’t perfect or 100% accurate – but it is relatively close. The IR sensor works by sending an infrared beam out on one side, then catching the light that is reflected back on the other side and calculating the distance based on the reflection time.
Startup the sensor/setup by typing:
python3 distance.py
Let the first reading come in, then place an obstacle in front of the sensor about 150cm or so away. Wait and see if the reading changed.
Notice that if you place an object too close to the sensor (within 10cm or so) the reading will start to be really inaccurate. Also, when there is nothing in front of the sensor, the readings will also vary greatly. You can filter out these results in your code and define a valid “range” if you wanted to.
Converting to Imperial units
To convert from cm to inches, simply divide the number by 2.54 in the while loop:
        dist = 16.2537 * v**4 - 129.893 * v**3 + 382.268 * v**2 - 512.611 * v + 301.439
        print("Distance in cm {:.2f}".format(dist))
        dist_inch = dist / 2.54
        print("Distance in inches {:.2f}".format(dist_inch))
        time.sleep(delay)
Follow this commit on gitlab.com
That’s pretty much it! We successfully converted an analog output sensor to a digital one with the help of the MCP3008 and a few extra libraries from Adafruit.
[…] that we have 2 sensors built and collecting data (PIR Motion Sensor & Distance Sensor, both built on Raspberry Pi) we should start doing something with the data. In more of a real-world […]